Adding a src/ Folder to an Existing ML Project: Step-by-Step Guide
So you already created a repository for your ML project, but now you want a better way to organize your code and maybe start testing it, too? That's when it's time to introduce some structure.
In this post I show you how I convert my existing ML code into a locally installed python package. Of course, it’s easier to set these things up right from the start… but this is real life. More often than not, we’re cleaning up earlier decisions once the project has already grown.
This is a widely recommended setup in professional Python and MLOps projects, and it makes your code easier to scale, test, and reuse.
Why Bother Adding a src/ Layout in Python Projects?
✅ Keeps your imports clean and intentional
✅ Separates project code from notebooks, configs, and data
✅ Prepares you for testing, CI/CD, and production deployment
✅ Enables editable installs (pip install -e .) for faster iteration
If you have no idea, what I'm talking about, this is what this could look like:
smartmeter-mlflow/
├── pyproject.toml
├── src/
│   └── smartmeter_forecasting/        ← your local library
│       ├── __init__.py
│       └── some_module.py
├── notebooks/
├── data/
└── ...
If it's not too late, use uv to set up your project
If you haven't started yet, you can use uv to set up this structure for you via the uv init --lib your_package_name, which sets up a uv-managed python project for you including a pyproject.toml for dependency management and the desired src/ folder for your package code.
I wrote a whole blog post about this, if you are interested: How to build a Python package with uv and install it locally
Step-by-Step: Adding a Local Package to Your Existing Project
This is what my project looked like before changing anything.
.
├── data/
├── explore_smartmeter_data.py # Code Notebook with loading, modeling, plotting
├── data_preprocessing.py # Some functions specifically for data handling
├── mlruns/
├── plots/
├── pyproject.toml
├── README.md
└── uv.lock
All the code is in the root directory in an "exploration" notebook (explore_smartmeter_data.py - I use # %% cell based notebooks instead of .ipynb notebooks) and one file that holds a bunch of functions related to data processing (data_preprocessing.py).
Both files are over 250 lines long, it's starting to get complicated to find things and technically I'm looking to add even more functionality, like grid search and further evaluation techniques, different models etc. It's time to move them into separate files and folders - which means building a package in python and building a structure to keep imports between files working.
1. Create the src/ Folder and Package (+ __init__.py)
It seems obvious, but the first step is really just to create a folder and name it src (for "source") - this is a convention stemming from compiled programming languages that had source code and compiled code. If you insist, you can name the folder something else, but you need to tell your build-tool that you did so. For the sake of following along with most tutorials and for other people to understand your code, I recommend following the naming convention.
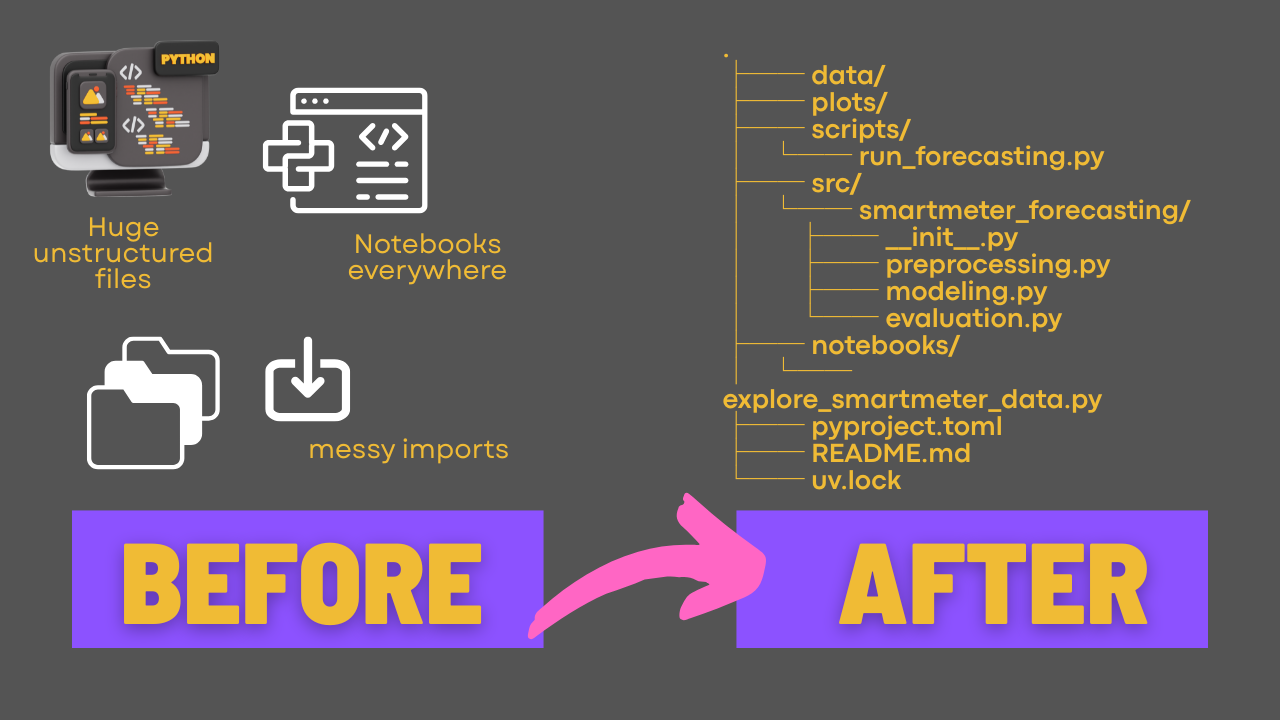
This is my target folder structure:
.
├── data/
├── mlruns/
├── plots/
├── scripts/
│   └── run_forecasting.py               # new: entry script calling package code
├── src/
│   └── smartmeter_forecasting/
│       ├── __init__.py
│       ├── preprocessing.py             # moved + renamed, data_preprocessing.py
│       ├── modeling.py                  # new: model logic, e.g., training
│       └── evaluation.py                # new: metrics, plots, scoring etc.
├── notebooks/
│   └── explore_smartmeter_data.py       # moved from root
├── pyproject.toml
├── README.md
└── uv.lock
Either click yourself through creating these folders, or do it via the terminal:
# 1. Create folder structure
mkdir -p src/smartmeter_forecasting
mkdir -p scripts
mkdir -p notebooks

# 2. Add __init__.py to mark your package
touch src/smartmeter_forecasting/__init__.py

# 3. Move and rename your existing files
mv data_preprocessing.py src/smartmeter_forecasting/preprocessing.py
mv explore_smartmeter_data.py notebooks/

# 4. (Optional) Create new placeholders files, e.g.
touch src/smartmeter_forecasting/modeling.py
__init__.py file in the main folder of your package (and every sub-package if you create those), as this tells Python that this is indeed a code package. The file can just be empty.2. Update the pyproject.toml to include the new local package
Make sure to add the package to your project file:
[tool.hatch.build.targets.wheel]
packages = ["src/smartmeter_forecasting"]

[build-system]
requires = ["hatchling"]
build-backend = "hatchling.build"
This tells your system
- where to find the new package and what it should be called (the name is important for importing code from it)
- which build system to use. Hatchling is a popular choice often used together with uv.
This sets up your package so you can import it from anywhere in your project - without messing with sys.path or manually copying code around.
3. Install your project in editable mode using pip
To use your local library during development, run:
uv pip install -e .
The -e . means “editable install”, so changes you make in src/smartmeter_forecasting/ are immediately reflected when importing the package.
If you aren't using uv, the command is simply
pip install -e .
4. Use it in your code via import
Now you can import it like:
# Before
import clean_data
# or
from data_preprocessing import clean_data

# After
from smartmeter_forecasting.preprocessing import clean_data
Final Thoughts on Project Structure for ML
You don’t need to get everything perfect from the start (I definitely don't). But as soon as your project starts to grow, structuring it with a local package in src/ will make your life a lot easier. It’s definitely noticeable once you add more complexity - like tests, pipelines, deployment, or other team members.
If you're interested in best practices like this, follow along - I’ll be sharing more MLOps tips as I work on my own machine learning infrastructure projects 😄
No spam, no sharing to third party. Only you and me.


Member discussion