How I Set Up a Machine Learning Project with `uv` and `pyproject.toml`

One of the biggest challenges in machine learning is ensuring that an experiment can be reliably reproduced. Of course, this includes a lot of things: from tracking which data was used for training, to remembering all training parameters, hyperparameters, and the specific code used for modeling. But surrounding all of this is the environment: the system you are running the code on, which Python version you have installed (and from which source), the libraries installed, their versions, etc.
All to avoid the dreaded "well, it works on my machine 🤷🏻♀️"
We also need to set up a new repository more often than most other coding specialties. Every new prototype and model gets its own repo to achieve optimal isolation. So it's important to have a setup that's quick to spin up, but also supports all the tools and decisions you might need on the way to deployment.
Here's how I currently do it (if I have the choice):
Dependency management: why we create virtual environments with uv and pip
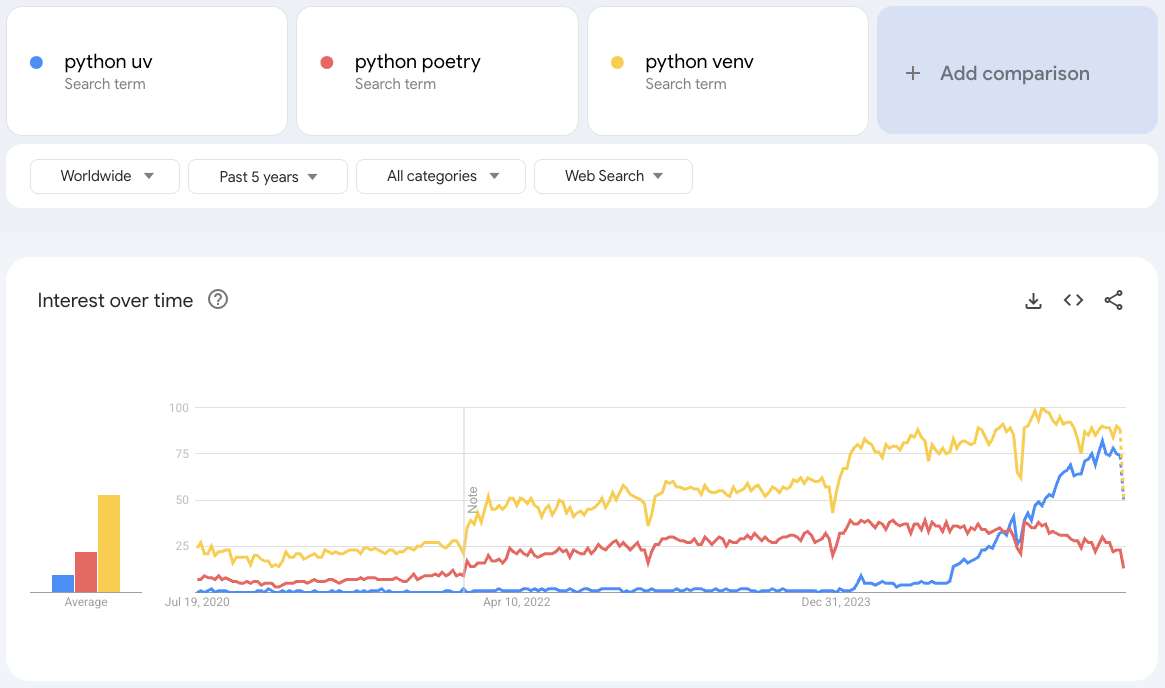
To solve the inconsistent environment problem, we need to isolate our project and its Python requirements from other projects on our computer. This starts with a virtual environment. In the past decade multiple tools have had growing and shrinking fan bases and I feel like I tried all of them at some points: pip, virtualenv, conda, mamba, pyenv, poetry, virtualenvwrapper, venv, pipenv. Most of these solved the problem of isolating your installations, but it was still really hard to ensure that someone else could recreate this environment in exactly the same way on their system.
Since 2024, uv has exploded in popularity as a new tool for managing your project, even beyond virtual environments:
uv still uses pip and venv, but it adds more functionality and ease of use:
- creates the virtual environment for you when you install the first library (so you can't forget)
- manages the project configuration and dependencies automatically via the standardized
pyproject.tomlfile, which is supported by many tools like theruffformatter,mypytype checker and many more - creates a deterministic lockfile (
uv.lockorpylock.toml) which not only lists high-level dependencies likepandas, but also which specific indirect dependencies should be installed to enable the high-level dependencies (If this means nothing to you, just know that it's a solution some experienced programmers came up with to ensure the same environment can be recreated across operating systems and environments without errors, deadlocks, and ideally, quickly too.) - includes a build backend and commands like
uv buildto ship your project as a package when you're ready
So, obviously, we will use uv here.
How to Install uv
The best I can do here is refer you to the ever-updating Installation page from Astral's uv
However, if you have Homebrew (https://brew.sh/), which I highly recommend on Linux and MacOS (and on Windows just use WSL and then also Homebrew) for coding tools, you can simply run:
brew install uv
Create a new Python project
uv comes prepared with an init command. For ML projects, I recommend the --package flag, since it creates a src folder, which is useful for testing and shipping the package to a cloud environment like Databricks for scheduling or deployment.
uv init --package your-project-name
This generates the following tree:
~/Documents/Coding » tree your-project-name
your-project-name
├── pyproject.toml
├── README.md
└── src
    └── your_project_name
        └── __init__.py
You can find other options for uv init in the documentation at https://docs.astral.sh/uv/concepts/projects/init/.
There is a manual approach, where you first create a folder, then add the virtual environment and all needed files manually with mkdir and uv venv etc. But unless you really know that the standard approach doesn't work for you, I wouldn't recommend it, because it's just extra steps and it's easy to forget one.
Install Packages (and Add Them as Dependencies)
To install any package available on PyPI into a virtual environment for your current project, use uv add. For example:
uv add numpy
This will run uv pip install numpy for you, but also add numpy as a dependency to your pyproject.toml all in one go.
If the virtual environment doesn't exist yet in your current project, uv will create one and then install the package automatically.
Development dependencies and other groups
Sometimes, we want to install a package locally, but it won't be needed for deployment. This could include convenience packages or even notebook-utilities. These packages should not be installed on the deployment server and should not be a requirement in the built .whl of your package.
Instead of listing these packages under dependencies in your pyproject.toml, you list them under [dependency-groups] and then dev. This is a special dependency group in uv, since it's used so often and is, for example, synced by default if you run uv sync. Theoretically, you could define other groups as well, like for linting or testing. Learn more about dependency groups in uv at: https://docs.astral.sh/uv/concepts/projects/dependencies/#dependency-groups.
As an example, in my current demo-project I use the following dev-dependencies:
[dependency-groups]
dev = [
    "ipykernel>=6.29.5",
    "marimo>=0.13.15",
    "nbformat>=5.10.4",
    "openai>=1.93.0",
]
Here, OpenAI was only used for a code assistant in the Marimo notebooks (https://marimo.io/) and will not be needed in the machine learning project itself.
Editable Packages (How to Use Your Own src Package in Scripts and Jobs Locally)
If you took my advice above and started your project with a src folder to build up the package you want to deploy later with your modeling logic, then you might be interested in how to install and use your own package.
Uv comes with a nice command for that use case as well:
uv add --editable ./path/foo
# most often with path = ., if executed in the root of the project alongside the pyproject.toml
uv add --editable .
This will automatically update the installed package every time you change a file within. It's the equivalent of running pip install -e ., but the above uv-command makes sure the change is persisted in the pyproject.toml so new team members joining the project get the install automatically on running uv sync.
Run Code (Using the Virtual Environment)
While you can run source .venv/bin/activate in your terminal session to manually activate the virtual environment and use the capsuled Python installation for every python ... command, uv also offers to manage that for you.
Every script executed via
uv run my_script.py
is automatically executed within the virtual environment. So you could say uv run my_script.py is equivalent to first activating the virtual environment and then running python my_script.py within that environment.
How I use the package structure in ML projects
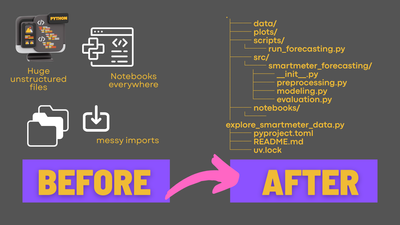
Here is an example of how I structure my project roughly after creating it via uv init --package as shown above:
.
├── config
│ ├── feature_config.yaml
│ ├── model_config.yaml
│ └── project_config.yaml
├── data
│ └── Hotel_Reservations.csv
├── main.py # I don't really use this and it just sits around, oops.
├── mlruns/... # MLflow runs and artefacts if working with local MLflow for demonstration purposes or private projects, ideally these would be on a server if working in a team
├── notebooks
│ ├── one_stop_notebook.ipynb
│ ├── one_stop_notebook.py
│ └── one_stop_script.py
├── outputs/... # plots and other intermediate results if working locally
├── pyproject.toml
├── README.md
├── scripts
│ ├── 01_load_and_split_data.py
│ └── 02_create_features.py
├── src
│ └── hotel_prediction
│ ├── __init__.py
│ ├── config.py
│ ├── data_loader.py
│ └── data_preprocessor.py
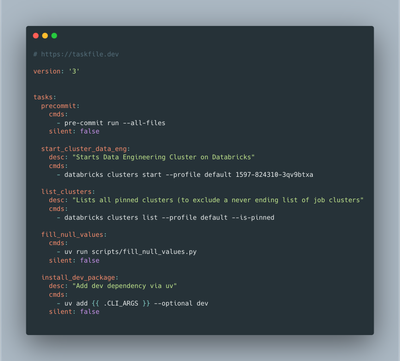
├── Taskfile.yml
└── uv.lock
As you can see, I add additional folders for:
- configuration (
yaml) files - data (if imported from
.csvfiles, such as for Kaggle challenges) - notebooks (if needed for the project; I don't particularly like them, but sometimes use them for demonstration purposes)
- scripts (for all stages of the ML lifecycle; these will later be promoted to "jobs" and deployed on Databricks, for example)
The src folder then includes all the logic and classes, which are used in scripts to keep those scripts super lean. Ideally, the scripts should serve only as entry points and not include any logic themselves.